You can’t please all the people all the time. However, you can please more of them more of the time with a preference center. Discover how to build email preference centers that reduce churn and improve engagement in this article.
Building and maintaining a healthy list of subscribers is critical to the success of your email marketing program, and something you put time and effort into achieving.
What happens if those subscribers churn? You have to invest more time and effort to find new subscribers to introduce to your email marketing funnel.
Now, what if there was a simple way for you to reduce the churn? There is. Email preference centers give subscribers an option other than saying “no more,” when they want to change how they interact with your brand.
Keep reading to learn how to reduce your unsubscribe rates and learn more about your most engaged subscribers by adding email preference centers to your email marketing mix.
If your email subscriber list is empty, do you have an email marketing program?
I’m not trying to wax philosophical by asking this question–I’m just pointing out the obvious.
You can’t market to email subscribers if you have none. That’s why a lot of email marketers cringe when they see their unsubscribe numbers start to rise.
“How could they do this to me?”
Your first reaction when someone unsubscribes from your emails may be to feel disappointment, frustration or anger. They don’t like your messages and that hurts. But, if you can set aside these feelings and choose not to accept the perceived insult, there is much that you can gain.
Speaking of philosophy, I’m reminded of a story told about the great and revered philosopher, Buddha. There are a few variations of this story, but the gist of them is the same.
While traveling and sharing his teaching, someone who didn’t like what he was saying approached Buddha. The person hurled insults at Buddha, freely sharing his negative option of the teacher.
Buddha listened in silence, waiting for his opportunity to respond, then said to his critic, “If you buy a gift for someone and they refuse to accept it, to whom does the gift belong?”
The person responded that, of course, the gift would belong to the giver as they had been the one who bought it.
“In the same way,” said Buddha, “your insults belong to you. I do not accept them and they can cause me no harm.”
Buddha is also noted for saying, “The darkest night is ignorance.”
Email subscribers have reasons for unsubscribing. If you can get past the insult and uncover those reasons, you can use that knowledge to improve your email campaigns.
Preference centers are your path to enlightenment.
Preference centers give subscribers a way to express themselves, telling you how they feel instead of just saying goodbye.
When you open your mind to accept this feedback, you gain knowledge that can reduce your subscription churn, improve engagement and increase conversions.
What is an email preference center?

-The first noble truth says there’s Dukkha – suffering, restlessness, friction – in the world-
A preference center is a central location where your subscribers can enter or change information about how they want to communicate with your brand.
Usually maintained on your website, a simple preference center, like the one in the image below, may allow subscribers to opt-down, or reduce the frequency of the emails they receive from you.
💻 Joss & Main keeps its preference center clear and simple. Subscribers can opt-down or opt-out in just a few clicks.

A more complex preference center may include frequency, topic and channel selections or allow subscribers to add demographic or other information that enables you to tailor their experiences with your brand.
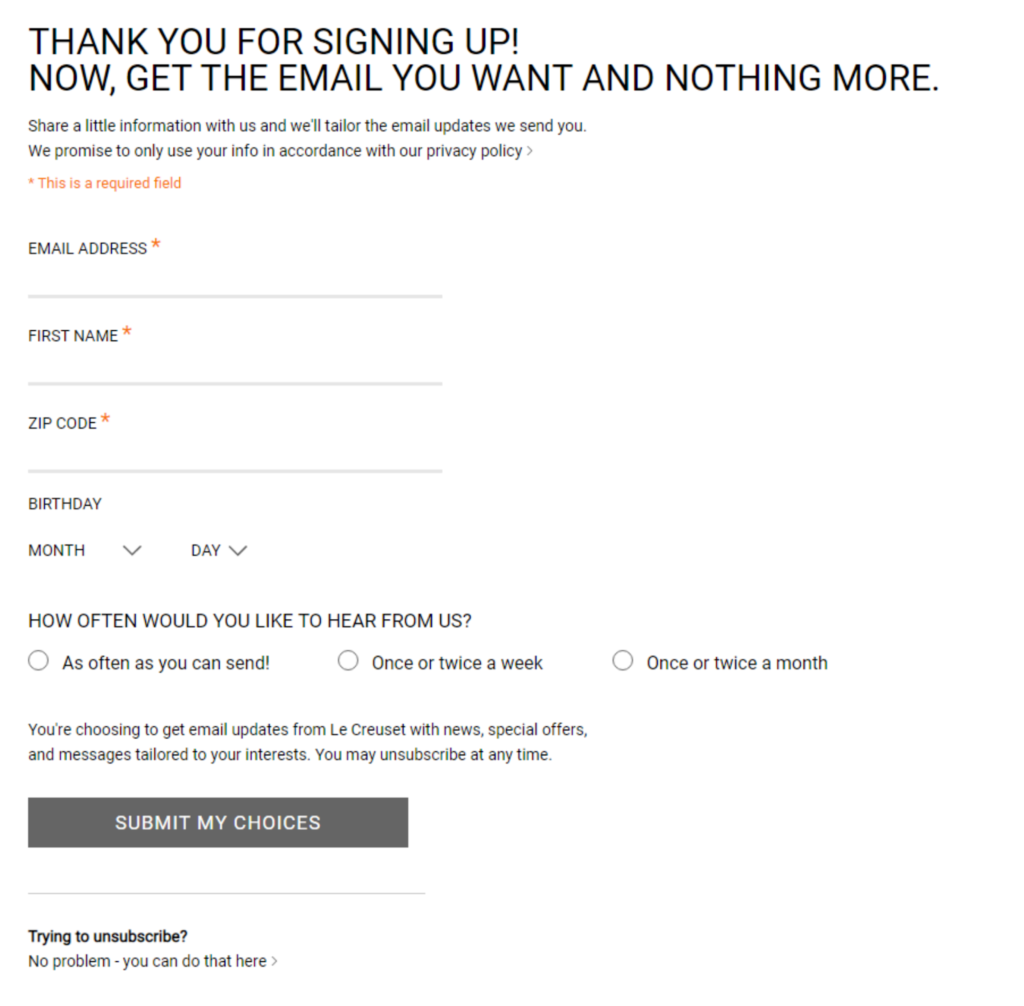
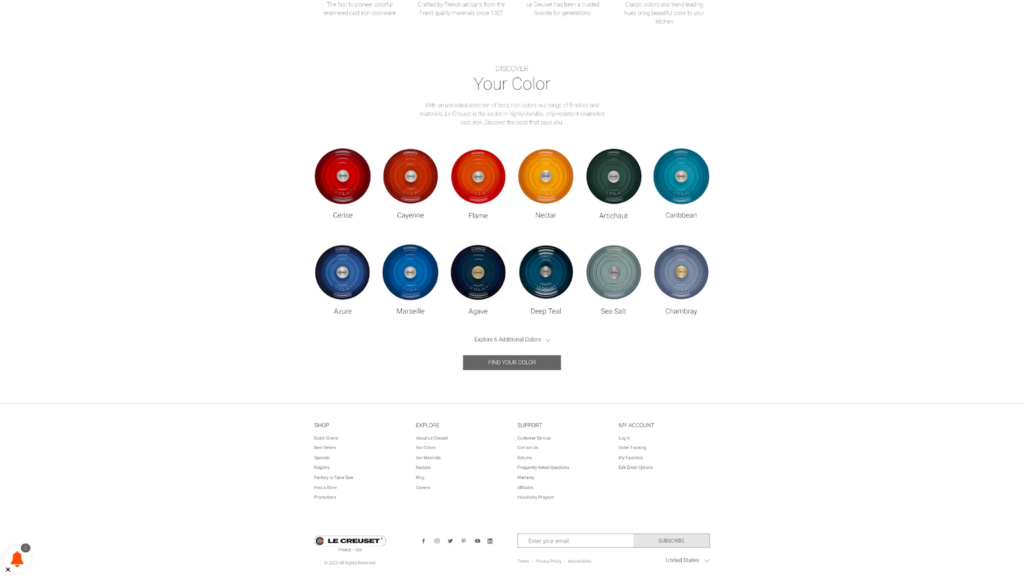
💻 Le Creuset invites subscribers to share their birth date, along with modifying their email cadence when they visit its preference center.
For example, visitors to Retail Touchpoints’ preference center can update their contact information, provide data about their company and role, select their areas of interest and the types of messages they want to receive, and change the frequency of their receipt.
💻 Subscribers who access the Retail Touchpoints’ preference center via the link found in the brand’s email messages arrive at a page that displays their current settings.

Having a preference center prepares you to meet changing expectations, serving as a consent management hub that puts subscribers in control of the data they’ve shared with you.
Offering subscribers more control over how they communicate with them and what information you use to manage those communications can help differentiate your brand and keep you ahead of regulatory changes as privacy considerations draw more attention.
Speaking of consent, while your preference center can (and should) include an unsubscribe option for compliance and permission marketing purposes, that’s not its primary purpose. A preference center is about improving your subscribers’ interactions with your brand, not ending them.
What are the benefits of having a preference center for your subscribers?
Preference centers help you preserve your relationship by building consumers’ trust in your brand and enabling you to enhance their brand experiences. You also gain improved deliverability and engagement for your email campaigns.
Here are some specific benefits you can look forward to:
✔ Reduce subscription churn by giving subscribers the option to turn down the volume
Without a preference center, a subscriber who wants to hear from your brand once a week but finds daily email overwhelming has a binary choice: Put up with inbox overload or unsubscribe from your list.
In a survey conducted by Baymard Institute, 51% of US online shoppers said they unsubscribed from a retailer’s email list because they received too many emails from the brand.
Empowering your subscribers to choose the frequency of your communications or take a break from receiving your messages can prevent them from breaking off communications altogether.
✔ Preserves your ability to reach subscribers’ inboxes by avoiding negative engagement signals
If your subscribers don’t opt out and continue to receive more messages than they want, they may become silent or passive unsubscribers. They’ll delete most of your messages without opening them–an (un)engagement signal that can land your future messages in their spam folder.
In the worst-case scenario, a subscriber frustrated by your message frequency may mark your messages as spam. Nearly one-fifth of consumers in a UK survey said they marked unwanted messages as junk or spam instead of unsubscribing.
✔ Helps you optimize your campaign frequencies
If a large percentage of your subscribers are opting-down, that’s a hint that you need to throttle your campaign frequency. You can optimize your sending cadence by analyzing which frequency your subscribers select when given multiple choices.
✔ Gives you fresh, accurate, straight-from-the-source data about your subscribers
When a subscriber visits your preference center, they are actively engaging with your brand and volunteering information about themselves.
Instead of trying to collect information about your subscribers through behavioral observation, you can ask directly, and they can withhold the information they don’t want to share. This type of transparent exchange builds trust and is the high-value zero-party data you need to create one-of-a-kind brand experiences for your subscribers.
Preference centers offer a continual way to collect information about your subscribers that begins from the moment they sign up for your newsletter.
💻 After subscribers sign-up to receive Enjoy Life emails, a second form (pictured below) asks them to tell the company more about their interest in the brand.

✔ Prevents you from losing touch with subscribers
If you’re like me, you have more than one email address. Many of your subscribers probably do, too. What happens if they stop using one of those addresses or lose access to it because they changed jobs? You may lose contact with them.
And what about subscribers who want to switch channels?
Your most engaged subscribers can use your preference center to keep their contact information up-to-date so they continue to receive your messages.
✔ Enables you to deliver more relevant content and a better subscriber experience
Preference centers enable you to gain information that you can use to create a customized experience for each of your subscribers. Your messages will be more relevant and more likely to be read.
What’s the bottom line?
Preference centers are a crucial component of a consumer-centric marketing strategy.
How to begin building a preference center that serves your and your subscribers’ interests

-The second noble truth explains there’s Dukkha because we cling to things and can’t let go-
Designing an effective preference center requires strategic planning. The final product must limit friction while answering your most critical questions. Follow these steps to develop your plan:
Step 1: Set your email preference center objectives
The first step in developing your brand’s preference center is to define what you want to gain from having a preference center and how you want it to benefit your subscribers. Are you creating a preference center to reduce subscriber churn, collect data, demonstrate your commitment to customer service–or maybe all of these.
As part of your decision-making process, consider the costs and benefits of pursuing each of your goals. A basic center that allows subscribers to opt down or change their communication channel will require fewer resources and time to build and deploy than a more complex system.
On the other hand, a center with more data-gathering capabilities can serve as a centralized consent and data management hub. Your subscribers can visit one page to add or remove information about themselves and change their communication preferences, giving them more control and you more data.
Step 2: Prepare your technical infrastructure
Next, identify how you’ll record and integrate the data gathered through your preference center. Which of your data management systems will you connect your preference center to and how will you transfer data between systems?
One way to ensure the smooth transfer of information between systems is to connect your preference center to your CRM or other data storage solution via API. This information can then be distributed from your data repository to your email marketing platform and other marketing tools.
Make your data exchange two-way to pre-fill fields and add relevant recommendations in your preference using dynamic content.
Ongage offers platform users the option to create a configurable PHP and JavaScript preference center that transfers data directly to your Ongage data set with no API coding. To build a preference center using this option, you just need to download the file package and follow the instructions on our knowledge base.
💻 Here’s an example of a completed preference center created using our package.

Step 3: Decide how you’ll manage preference center access and security
Consumers are concerned about the security of the data they share with brands and look for signs that they can trust you to keep the information they share with you safely. At the same time, adding too much friction to the process of updating their preferences may turn your subscribers away.
The right balance between privacy protection and ease of use will be different for every brand. How much information subscribers can access or change through your preference center and the nature of the products and services you provide will influence just how cautious you should be.
As I’ve visited various preference centers while preparing this article, I found that many were easy to access and change. I only needed to enter my email address to begin changing my communication settings.
Others, particularly my subscriptions with brands offering business-related products and services, were accessible only through a customized link sent following my request.
💻 A click on Y Combinator’s on-page preference center link triggers a pop-up instructing the subscriber to click to request an email link that they must then follow to change their preferences.

This two-step process ensures that only someone with access to my email address can access my preferences with the brand.
Should you use dynamic content to fill in the details for your subscribers?
Several B2B and B2C preference centers pre-filled the page’s email field with the email address I used to access the page. Some, but not all, of these pre-filled entries were masked.
💻 Penguin Random House masks the email address field on its preference center to protect subscribers’ privacy.
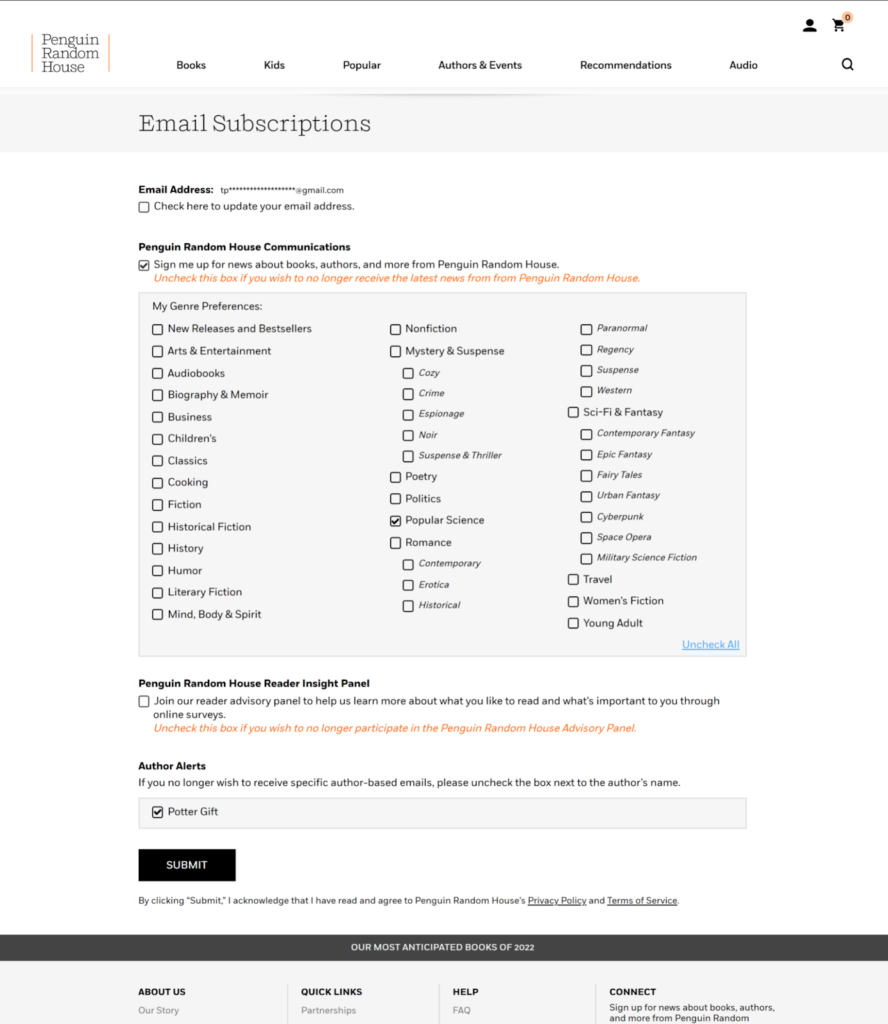
Populating your preference center’s fields offers your subscribers convenience but may make them feel less secure. Masking data such as the subscriber’s email and name can help relieve their concerns.
Step 4: Choose the specific options you’ll offer subscribers
Finally, decide exactly what information and options your preference center will include. Loop back to Step 1 to guide your selections and develop a preference center that gives subscribers what they want and gathers valuable intel for you.
A customer-centric preference center will let subscribers:
- Pick their frequency. As you may have guessed, based on the reasons they unsubscribe, your subscribers want to reduce the frequency of your emails. So make sure your preference center includes an opt-down option.
Give your subscribers added flexibility by also including opt-in and opt-up choices on your preference page. Our article about Mother’s Day email campaigns explains the importance of providing subscribers with a way to opt out of occasion-based campaigns that they may find upsetting.
With these additional options, your preference page does double duty as a subscription sign-up form and allows subscribers who have opted down a way to reverse their decision.
- Choose which content they receive. Giving your subscribers a choice about what content they’ll receive from your brand reduces the number of irrelevant messages they receive from you and provides you with valuable zero-party intel about what they want.
Bonus score!
Include checklists or fields on your preference center that allow your subscribers to:
- Choose from a broad list of topics or areas of interest.
- Select specific newsletters by title or content type.
- Identify the product lines or services they want to hear about.
- Elect to receive only certain types of emails, such as product updates, promotions and discounts, or event notifications.
💻 The Axios preference center (shown below) showcases the content the brand offers and lets subscribers pick their favorites, listing each of its newsletters and other email publications in a check-the-box format.
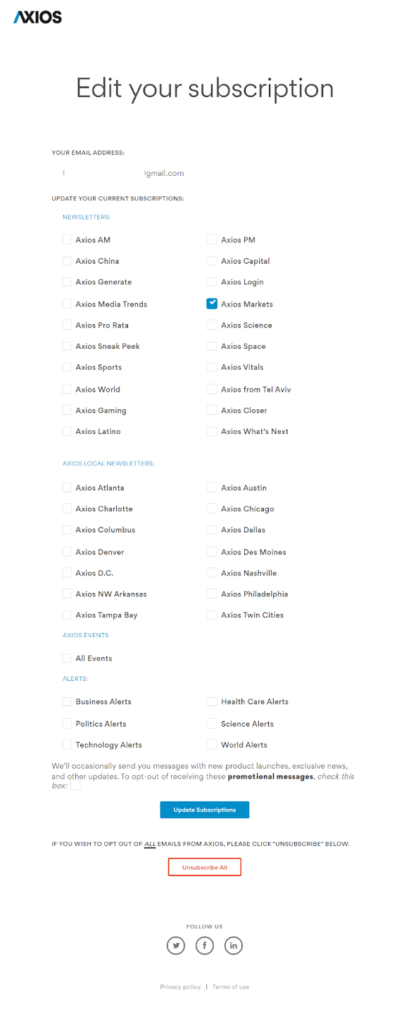
Subscribers can also opt out of receiving promotional messages from the brand or from receiving all messages on the same page. Axios reduces friction by pre-filling the subscriber’s email address field and indicating which newsletters they are currently signed up to receive.
- Customize their experience. In addition to options that allow subscribers to order their favorite content from your menu, include ways for them to tell you what kinds of content they’d like you to serve. Use checklists and form fields where your subscribers volunteer demographic and psychographic data to personalize the content you send them.
💻 This preference center for retailer Mark’s, collects basic demographic information plus valuable data about its subscribers’ shopping preferences.
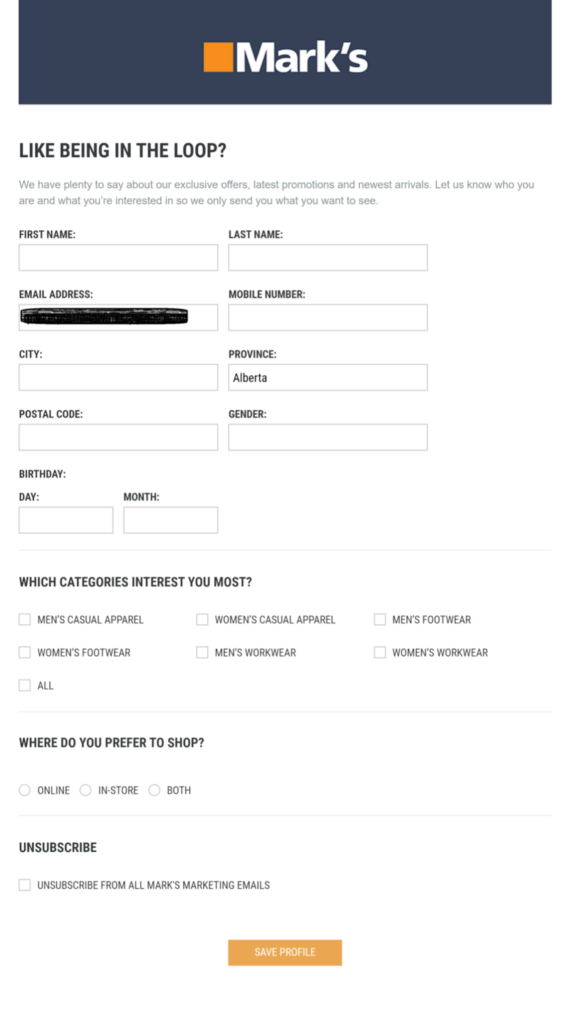
Of course, you may not be able to collect all the information you want without overwhelming your subscribers. So start by seeking data that you can use to enhance your subscribers’ experiences.
For example, if you operate a meal kit site, include a list of common food restrictions or preferences on your preference center so your vegan customers can opt out of receiving meat-lovers promotions and don’t place your keto customers in the high-carb segment. (Is anyone in the high-carb segment?)
In a story about a well-educated but impatient student who wanted Buddha to teach him. Buddha is said to have warned against filling one’s head with so much knowledge that there is no room to gain more. You may need to experiment to find just the right balance between too much information and not enough.
- Change their channels. Does it seem like there’s always some new disruptive communication app popping up or is that just me?
Your email subscribers are really digital subscribers and they may favor another communication channel now or in the future. Maybe email was the only choice you gave them and they’d prefer to receive marketing communications via text. 🤷♀️
There’s a way to find out!
If you want to make sure you’re sending the right message at the right time and your subscribers receive it, let them tell you where to send it.
💻 Sheffield Young Carers asks new subscribers how they’d like to hear from the brand and provides several channel choices plus a one-check way to opt out at the bottom of its contact form.
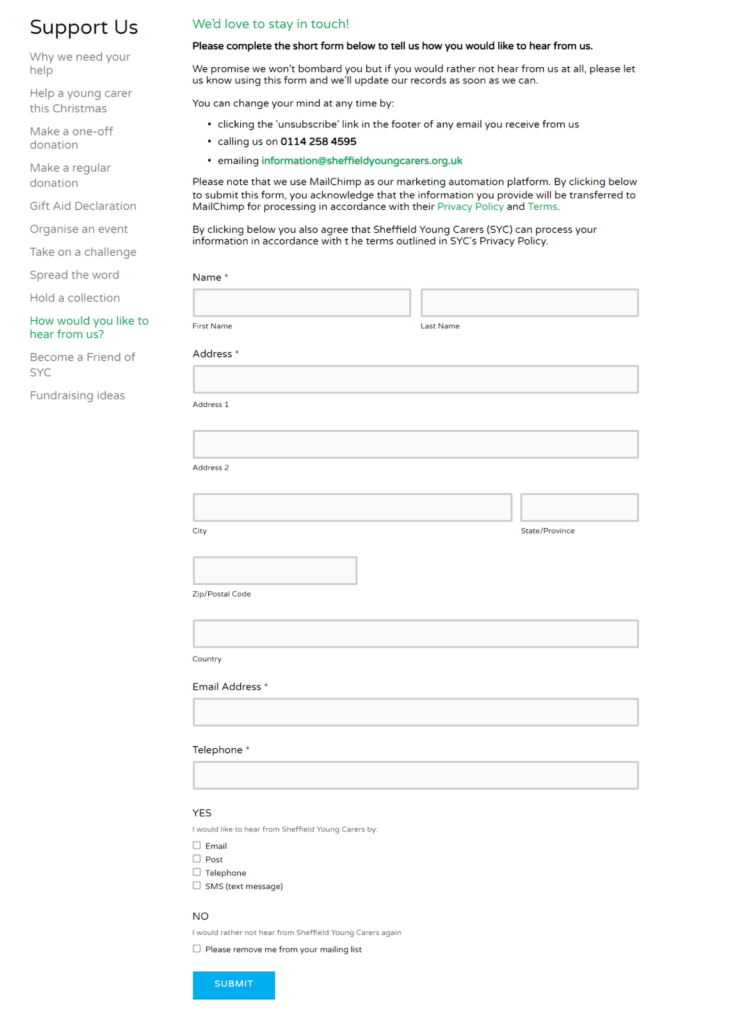
Also, your subscribers may want to receive different types of communications through different channels.
For example, they may want to receive delivery, back-in-stock, or sales notifications via text so they can respond quickly while getting informational newsletters, replenishment reminders and other less time-sensitive content via email. Our article, How Email and SMS Marketing Power Up Your Growth, explains how to combine SMS with email to meet every subscriber’s needs.
How can you keep up with your subscribers’ changing channel preferences? Try adding a multi-channel selection form to your preference center.
💻 Spotify’s preference center gives subscribers a choice between email or mobile push notifications for several communication categories.
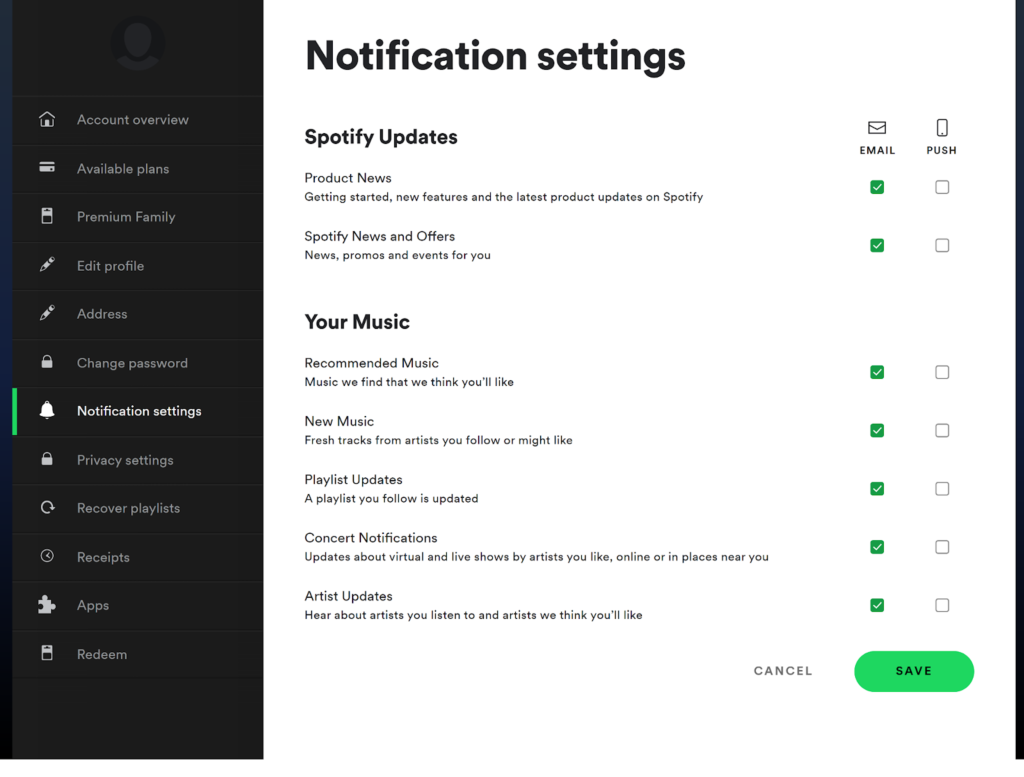
Do enough of your subscribers want this level of control to justify creating this more complex interface?
To find out, ask them directly through feedback surveys or conduct A/B testing to see which type of preference center generates the best engagement and satisfaction ratings.
- Take a break. Everyone needs a break sometimes, and that may include a break for receiving emails. For instance, your vacationing subscribers probably don’t want to return to their office (or that desk in the corner of their living room where they take video calls) and have to sift through an inbox filled with stale promotions, updates or announcements from your brand.
Offering your subscribers a break as an alternative to unsubscribing can keep them on your list and protect your deliverability metrics.
💻 West Elm offers subscribers several options on its preference center, including taking a break from receiving the brand’s email campaigns.

Throughout your preference center planning process, rank your data-collection and customer service objectives because you may have to make some tough choices.
It won’t be possible to gather every piece of information you’d like to have through a single. Instead, your preference center should prioritize gaining the data that supports relationship marketing strategies that deliver positive subscriber experiences, and maximize your conversions and revenue.
After you’ve evaluated your options and know what you want to achieve, it’s time to build your preference center. Use the following tips to create an appealing digital subscriber preference center that keeps your subscribers happy.
7 Digital subscriber preference center best practices

-The third noble truth tells us there’s a way to let go-
Improve your subscribers’ email (and omnichannel) experiences with your brand and the usability of your preference center with this advice.
#1: Make your preference center easy for email subscribers to find
There are several tactics you can use to ensure your subscribers don’t miss noticing your preference center.
First, keep your preference center in the same visual field as your unsubscribe link. Most email marketers include an unsubscribe as a standard inclusion in every email template’s footer.
Deflect subscribers who are headed toward clicking that unsubscribe link by putting your preference center’s link right next to it. Use clear language indicating the difference between the two and explaining the value your preference center offers.
Don’t go too far with this tactic by trying to hide your unsubscribe link. Just make sure your subscribers know they have options.
📧 The footer of this email from Product Hunt presents subscribers with three different options and explains each one.

If you use a list-unsubscribe header as well as a footer link, place your preference center’s link at the top of your email, too.
📧 In this promotional email, Personalization Mall includes unsubscribe links in the header and at the top and bottom, plus a preference center link at the top.

Also, provide non-email paths to your preference centers by adding a link to the center on your subscribers’ account setting page and/or your website’s footer.
💻 The footer at Le Creuset’s website includes a link titled “Edit Emails Option” that subscribers can use to modify their email preferences.
Enlist your preference center for double-duty by allowing new subscribers to opt in and set their preferences in one session through a link on your website. Of course, consider the security implications of each pathway and use user identification methods that prevent someone other than your subscriber from making alterations.
#2: Promote your preference center
A surprising number of brands don’t offer preference centers or don’t promote them. Keeping more of your subscribers might be as simple as telling them they have an alternative to unsubscribing.
For example, some email unsubscribe links are one-click. Anyone who clicks on them is unsubscribed, while others take users to a page where they can change their preferences.
The problem is–your email recipients don’t know what’s behind the link until they click. This can lead subscribers to being placed on your suppression list when that’s not what they want. (It’s happened to me!)
If you’re offering users choices, make it clear in your footer text.
💻 Misfits Market uses a one-click unsubscribe feature but enables clickers with regrets to take it back with a resubscribe button on the confirmation page.

Footer links aren’t your only choice for promoting your preference center, though.
Tell subscribers about your preference center in your email’s copy, launch email or social media campaigns to spread the word and create CTAs just to encourage them to use the feature.
Proactively promote your preference center
- When you notice an increase in opt-outs (or spam reports 😬).
- When your engagement metrics signal that you have a lot of passive unsubscribes.
- As part of your welcome and onboarding sequences.
- In your re-engagement campaigns.
#3: Tell the people what they’ll get (and keep your promises)
I know, I know, I’ve mentioned clarity already. But I’m mentioning it again because it’s really important.
People don’t like uncertainty and are more likely to take action when they understand what’s in it for them. Clarity in promoting your preference center is how you eliminate the uncertainty and communicate the understanding that gets subscribers to use your preference center.
Clarity about their choices once they arrive at your preference center is how you build trust and eliminate misunderstandings. If your preference center lets subscribers opt down to receive fewer emails, you need to make sure your automated sequences don’t override this request.
For example, if you’ve promised to send only one email a week and you send subscribers a weekly newsletter, sending a separate drip campaign may break your promise. Set frequency caps that pause your automated sends once a subscriber’s preferred number of emails per period has been reached.
It’s also a good idea to add a note near your opt-down feature explaining to subscribers that they may still receive transactional notifications, even after they’ve chosen to reduce the frequency of your messages.
Another way to add clarity to your preference center is to add descriptions next to your category or newsletter selections.
You may know exactly what you mean by “Events” or “Promotions” but do your subscribers?
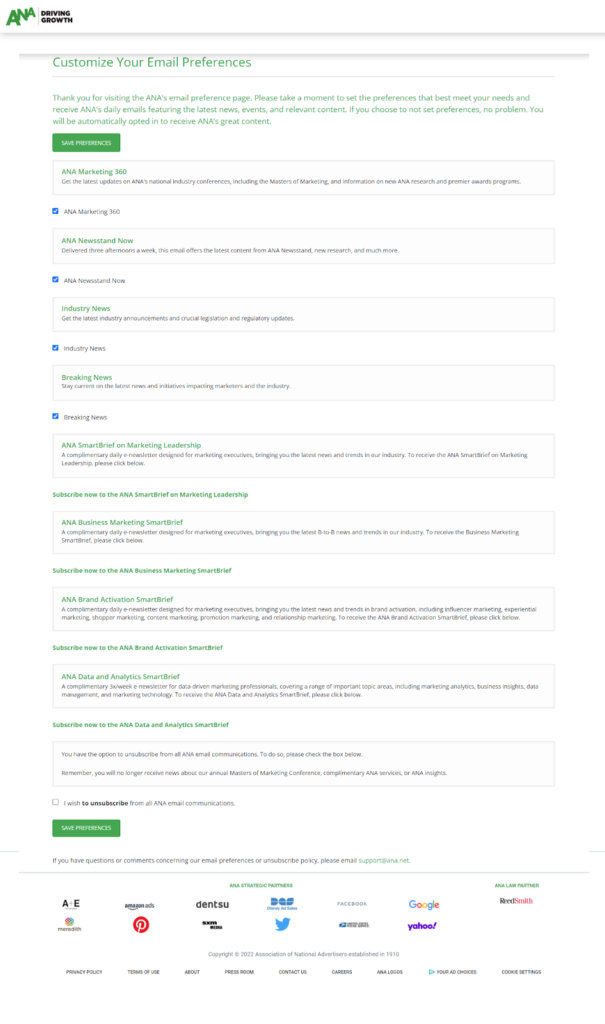
💻 ANA’s preference center briefly describes each option and a note reminding subscribers that if they choose to opt out of everything, they’ll no longer receive updates about the organization’s annual conference and other services.
When you set up your email categories and campaigns, think about how your subscriber will mentally categorize the messages they receive.
If you send a message promoting a webinar, will they consider this an event notification they’ve opted-in to receive or a promotion that they don’t want?
Will subscribers who opted out of new product or service announcements be confused if you send a newsletter that features your latest product or service offerings?
Continue to monitor your unsubscribe and spam complaint metrics after you implement your preference center for signs of miscommunications.
#4: Take the friction out of the process
Preference centers can enhance your subscribers’ experience with your brand, but there’s a limit to how hard they’ll work to get those benefits. If your subscribers encounter too many obstacles when entering their preferences, they’ll abandon the process. And they may abandon your brand.
Pay careful attention to your preference center’s UX, so subscribers have no reason not to use it.
Make your preference center experience pleasant and friction-free with these tips:
- Label and place the most sought-after options at the top of the page. Unsubscribe and frequency choices should be among your top contenders for these top spots, but you should conduct your own testing to find out what matters most for your customers.
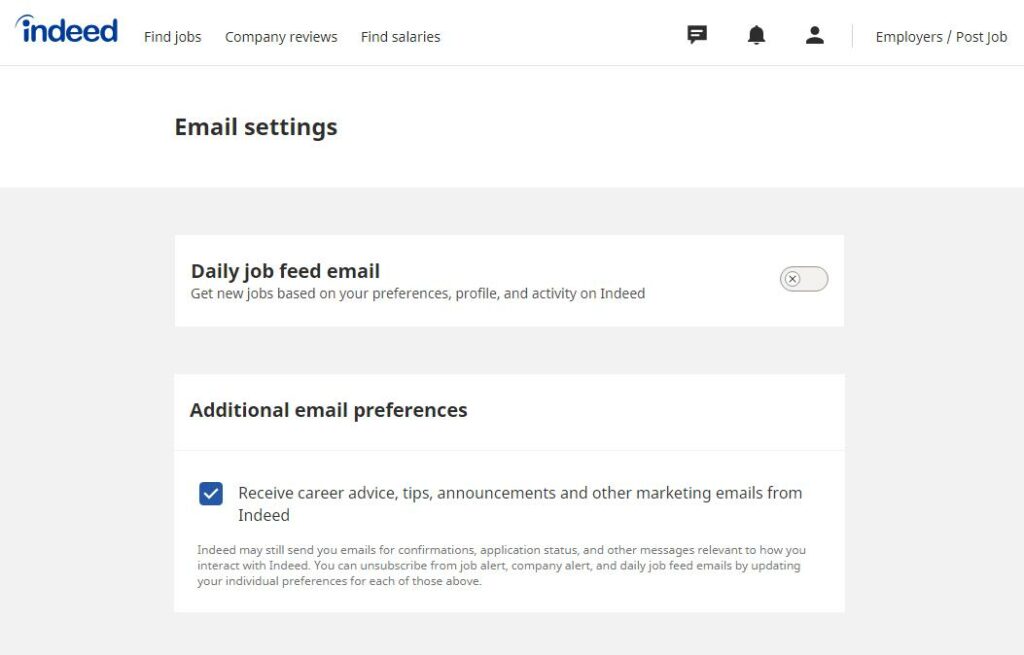
💻 Recognizing that successful job seekers don’t need to continue receiving daily job updates, Indeed makes it easy for them to opt-out of those emails only.
One way to find out what your subscribers are looking for when they visit your center is to use a heat map. You can also ask for feedback about your page’s UX with a pop-up or on-page survey.
- Don’t create drop-downs that appear to go on forever. Drop-down menus are a great way to save space and avoid overwhelming subscribers with field after field. But a drop-down with too many choices creates problems of its own. Your subscribers may choose something from the top of the list even if it’s not the best match or skip the selection process altogether.
If your subscribers can’t view all the choices in your drop-down list without scrolling, you may be asking too much of them.
- Check your user flow (better yet, ask someone else to). It’s easy to believe your user flow is intuitive when you’re the one who designed it. But don’t trust your intuition on this. Ask someone who wasn’t involved in the design process to give your preference center a try and report back on the ease of its navigation.
- Make your preference page accessible and mobile-friendly. Accessible, mobile-friendly design is a necessity for modern digital marketing. People have plenty of brands from which to choose and won’t hesitate to move on if you don’t deliver a seamless user experience at every touchpoint.
- Separate your center into stages. Breaking complex processes into smaller steps can help reduce cognitive friction. In other words, your subscribers’ eyes won’t glaze over from encountering a wall of choices. Organize your preference center in sections that will make sense for your users and use visual and text cues to distinguish between them.
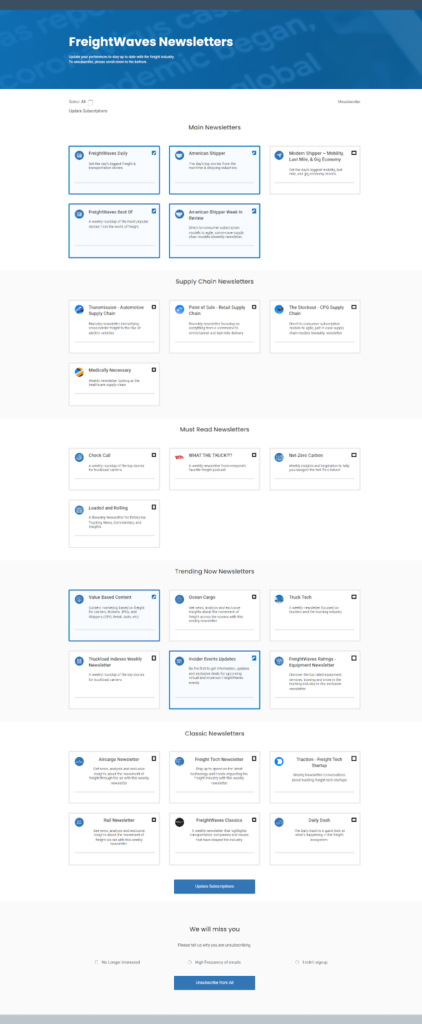
💻 Freightwaves segments its newsletters into several categories to help subscribers navigate its preference page. A detailed description for each choice guides subscribers and encourages them to choose additional newsletters to subscribe to.
You can also use a multi-page form to separate different information categories such as demographic, interest and privacy data.
#5: Be your (brand) self
Your preference center is a part of your communication flow, so make sure it goes with that flow by representing your brand’s personality and tone of voice. As with all your communications, clarity should be your first priority, but that doesn’t mean you have to be boring.
💻 Dot & Bo uses snappy copy to help subscribers select the message frequency that suits them.

Use language, color, graphics and a design that reminds subscribers why they are interacting with your brand in the first place and encourages them to continue the relationship.
💻 This unsubscribe landing page by Chubbies offers subscribers the option to receive fewer messages or unsubscribe while maintaining the brand’s cheeky tone of voice. The brand also tries one last save by suggesting that unsubscribers connect via social media instead.

#6: Grab some data from subscribers on their way out the door
Sometimes, you just can’t avoid an unsubscribe. But, hey, you may still get something useful out of that final interaction. After confirming the unsubscribe, ask your departing user for feedback about what you could have done better.
💻 Freightwaves’ preference center includes an unsubscribe option accompanied by feedback.

⚠️Don’t require feedback as a condition of unsubscribing, though. This may violate anti-spam laws and is just plain annoying.
#7: Track your preference center performance metrics
You know everyone here at Ongage loves data. Tracking your email campaign performance metrics is crucial to making the necessary improvements that drive revenue. Preference centers have their own set of metrics that you can use to see how they’re doing, identify gaps and continually improve.
To analyze your preference center’s performance, look at the following data points:
# How many subscribers visit the preference center. Collect a raw total and further break this number down as a percentage of total subscribers. Track the performance of this metric over time, making note of any surges or drops.
# The channels through which subscribers access your preference center. If your subscribers have more than one way to reach your preference center, keep track of which channels drive the most traffic there.
You can also examine factors such as which campaigns trigger the most click-throughs to your preference center and where subscribers are in their buyer’s journey when they make the click.
# How many subscribers make changes through your preference center. In addition to hot maps that show what parts of your center get the most attention, whether and what kind of changes people make when they reach your preference center can tell you a lot about its effectiveness. Are they finding the choices they hoped for? Are they abandoning the effort because of poor UX?
💡Tracking which types of options (frequency, topic, etc.) subscribers change most often and what choices can also tell you a lot about what your customers want from you.
# Your preference center’s NPS or other sentiment score. Do they like it? Do they really like it? Use surveys to uncover the truth about how your subscribers feel about your preference center and what they’d like to see changed.
Besides these preference center-specific metrics, you can also examine post-launch trends in your deliverability, engagement, bounce, unsubscribe and complaint rates to form some hypotheses about your preference center’s performance. You’ll find a complete list of email metrics and how to calculate them in Ayal’s article, How email analytics can drive engagement.
You should also see improvements in your data accuracy and segmentation capabilities as your preference center matures.
Use what you’ve learned from your preference center to optimize your campaigns

-The fourth and last noble truth teaches us how to let go with the eightfold path-
Adding a preference center to your email marketing program is a win for you and your subscribers. They get to customize and control their interactions with your brand and you get valuable data in exchange.
How can you use that data?
🚀 The information that subscribers share via your preference center can help you create better segments and identify where your subscribers are on their buyers’ journey. Follow the advice in the article, Dynamic Email Content: How to Apply and Use It at Scale, to customize your subscribers’ messages at scale using the data they share in dynamic fields or blocks.
🚀 What you learned about your customers’ preferred sending frequency and channels can help you determine when to send your most important messages and by what method.
For instance, if most of your subscribers opt to receive messages once a month–your monthly newsletter should include a summary of the most critical information you’ve shared throughout that month.
And, if a significant percentage of your subscribers are opting-in to receive text messages for some or all of their communications, then you should send SMS teasers or alerts whenever you send a significant email campaign.
🚀 Of course, it’s always important to test your ideas, even the data-driven ones, before you implement them at scale. So, after gathering these new insights from your subscribers and developing your ideas, use A/B testing and other evaluation methods to vet them.
How does that work? Find out how to set up an A/B testing program that helps you distinguish between correlation and causation in our A/B Testing Complete Guide.
May you find enlightenment at every step along your path.

