The retail holiday season is underway, and experts are still trying to predict how consumers will behave. One thing is certain, this year is going to differ from last. What do your subscribers want to find in their inboxes this Christmas? Go ahead and unwrap this gift now. It’s our report on the consumer sentiments driving holiday spending and purchasing decisions this year.
As Christmas and winter holiday shoppers head online and into stores this season, they are contending with personal financial pressures and global political instability. They want shopping experiences that make them feel safe and in control. They need shopping experiences that allow them to fulfill their friends’ and loved ones’ holiday wishes without breaking their budgets.
But saving money isn’t the only thing on shoppers’ minds. Consumer surveys and economic forecasts reveal a complex mix of considerations affecting what your customers will purchase, when they’ll make those purchases, and how much they’ll spend this holiday season.
Throughout the year, consumer confidence and sentiments have fluctuated.
However, across multiple surveys and reports, several key trends with staying power emerged.
When subscribers open holiday marketing emails this year, they’ll be hoping to find:
🎁 Savings,
🎁 Security,
🎁 Convenience,
🎁 Trust,
🎁 Values and
🎁 Hyper-contextualization.
These factors will influence how subscribers respond to your holiday marketing emails and whether those campaigns are a success.
Use these external insights plus the information you gained from the previous season’s Christmas newsletters and holiday campaigns, the results of your other 2023 seasonal sales events, and your Black Friday/CyberWeek performance data to discover what matters most to your audience.
You probably know by now that I wouldn’t just give you a list without some data to back it up (and some advice for what to do with that data).
So, in the following sections, you’ll find the details explaining why these six consumer wishes should guide your 2023 Christmas and winter holiday email marketing strategies.
🎁 Savings: Consumers shift from YOLO spending to watchful waiting for the Christmas season 2023
Saving money will be the most significant influence for many people as they head into the end-of-year gifting season. While some of your subscribers still have room for indulgence in their budgets, most will look for holiday season promotions that help get the most out of every expenditure.
Google’s Richard Manso warns retailers to “be ready for determined shoppers” in an October Consumer Insights brief. Manso notes that this year’s holiday buyers will shop late into the season “using all days and resources available to them both in-store and online to get their shopping done” and find the best deals.
As savings shrink and uncertainty grows, Last year’s ‘YOLO Spenders’ have become ‘The Shoppers Who Wait.’
Inflation, interest rates, layoffs, and a depletion of pent-up savings in service of pent demand for travel and discretionary spending are responsible for rapid fluctuations in consumer spending throughout 2023.
“People across the globe still have significant concerns about their ability to pay for essential goods and services,” writes OliverWyman partner Jens von Wedel in an article describing the impact of inflation on consumer spending patterns.
Referencing a survey of 10,000 consumers across 9 countries conducted by the management consulting firm in June 2023, Wedel notes that 80% of respondents had adjusted their buying behavior in response to economic pressures.
Survey respondents around the world reported taking the following actions to reduce their spending in 2023:
👛 Reducing how much they purchase,
👛 Looking for cheaper alternatives for the items they want,
👛 Substituting their favorite brands with private label goods,
👛 Shopping online for better prices,
👛 Buying items when they are on sale,
👛 Delaying major purchases,
👛 Purchasing (and storing) in bulk to get discounts,
👛 Forming buying groups to make bulk purchases,
👛 Using more coupons and
👛 Financing their purchases with options such as ‘buy now, pay later’ plans.
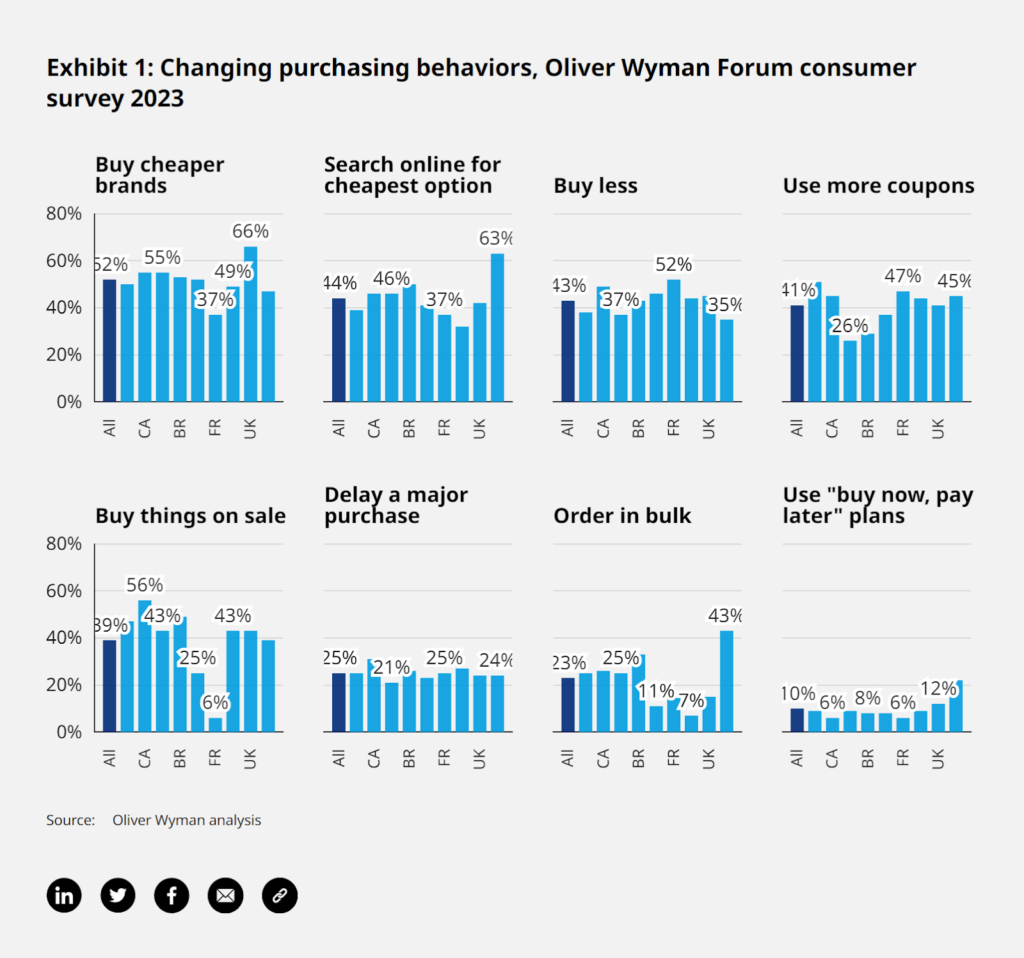
The chart set pictured above is from an interactive exhibit featured in the article that illustrates the distribution of adoption rates for various cost-saving measures in different countries.
Shoppers still plan to spend this holiday season (just not on everything)
According to consumer confidence reports, spending is still increasing each month–but the rate of increase has slowed.
Bank of America monitors its customers’ use of credit and debit cards, transferring funds or writing checks to gain insights about consumers’ spending patterns.
The financial institution’s analysis reveals that after growing at a pace of 10% between 2021 and 2022 (the YOLO period), the consumer spending growth rate in September 2023 was just 4.5%.
Not everyone is bargain shopping this year, though.
Mixed signals from economic reports and consumers are making it difficult to predict what the season’s shopping behaviors will be.
📈 At the same time, many people were stocking up on discounted protein shakes and batteries during Amazon’s fall Prime sales event; they were also buying luxury handbags from non-Amazon retailers despite a 29% decline in discount rates.
This behavior doesn’t necessarily represent two distinct groups of shoppers, though. McKinsey notes that a group it calls ‘Zero Consumers’ engages in spending patterns that hit both highs and lows.
These shoppers get their name, in part, because they have “zero midrange.’ Zero consumers look for savings in categories where choosing a specific brand or product isn’t as important to them, so they can splurge on the items they really care about (like handbags or athletic shoes).
As you may have guessed, Zero Consumers have “zero loyalty” when shopping for bargains.
The premium party might not last forever, though. An increasing number of consumers are turning to credit to cover household essentials.
📉 A report issued by Brookings warns that global household debt levels are at historic highs and could lead to reduced spending in the future.
Access to credit may be tightening as well. A biennial report by The US Consumer Financial Protection Bureau (CFPB) indicated that nearly 10% of US consumers were in a “doom loop” of persistent debt. The report noted that rising late fees and dropping credit scores pointed to more credit stress in 2023.
Zero midrange is shaping up to be the norm this holiday season.
Prepare Christmas email marketing campaigns for spenders and savers
Some of your subscribers may still want to shop like pop stars this holiday season: “I see it, I want it, I buy it.” 💅 Consumers wanting to forget their cares and create treasured memories may choose to set aside financial concerns for the season.
Others are likely to take a more pragmatic approach, carefully managing each expenditure to minimize their long-term costs.
Mastercard Economic Institute’s Michelle Meyer predicts that most consumers will “impressively navigate the holiday season, making choices and trade-offs that best suit their lifestyles.”
Commenting on the initial results for Black Friday 2023, RetailDive notes that consumer spending broke records. Yet commentators are choosing words like “caution,” “discerning,” and “choice” to describe shoppers’ spending behaviors.
We saw similar references to trade-offs in reports about consumers’ 2023 back-to-school spending plans. Parents were willing to invest in the tools for success for their children by sacrificing elsewhere.
Use data to discover how your subscribers are feeling about their financial security as they enter the holiday shopping season.
As you plan and make last-minute adjustments to your holiday campaigns, examine the latest holiday spending forecasts and consumer trend reports along with your internal data.
🔹 Monitor your sales performance, email engagement, and other data streams to develop an up-to-date profile of your audience and its various segments.
Some of your subscribers may choose to purchase less this year or wait for end-of-season bargains to complete their shopping. Others will make compromises on the brand or the version of the product they buy.
Maybe they’ll purchase a smaller bottle of fragrance or a wallet instead of a handbag.
Use your real-time data to improve your segmentation and better understand your customers’ spending moods this holiday season.
🔹 Prepare to move away from the midrange. Is your brand among the ones that will benefit from shoppers willing to splurge, or are your customers seeking savings?
Identifying and segmenting the different personas among your subscribers is key to developing effective campaigns when there’s limited upside to targeting the midrange.
What if your audience includes ‘want it, buy it’s shoppers and bargain hunters?
Send your subscribers who want to enjoy the magic of the season and forget their worries emails presenting the experiences their purchases will bring. Emphasize exclusivity and indulgence.
Save your messages about the best prices and steep savings for your ‘cautious consumer’ segment.
🔹 Economic observers warn that consumer confidence is changing in “real time” as geopolitical and economic factors affect their budgets.
Use your analytics tools to help you tailor your Christmas and year-end holiday shopping appeals to respond quickly to your audience’s shifting wants and needs.
🎁 Security: In times of strife, people want brands to help them feel safe
Being able to purchase essentials is high on most consumers’ lists because it’s a need you can’t ignore. But feeling safe is pretty important, too.
Each year, global communications firm Edelman conducts a worldwide survey to understand how consumers feel about the economy and brands. This year’s survey gathered responses from 13,802 people across 14 countries.
This year, more than half of global consumers taking part in the survey said they felt insecure about climate change, inflation, global conflict, their personal health, polarization, misinformation, and rights and freedom.
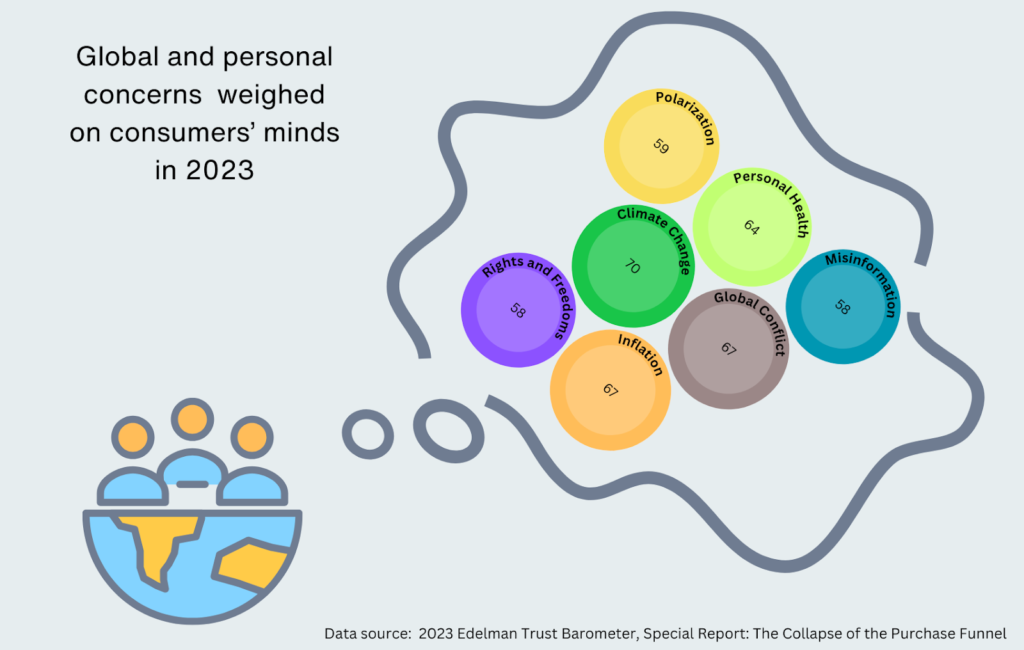
The image above illustrates the depth of consumer concern for each of these hot topics.
Despite financial pressures, 70% of consumers still had climate change weighing heavily on their minds when they responded to Edelman’s May 2023 survey.
Inflation and global conflict tied for second place, concerning 67% of the people responding to the survey. Just under two-thirds of consumers were worried about their personal health.
Consumers craved comfort over excitement in 2023
The Edelman survey also asked consumers which type of brand was more attractive to them, one that increased their sense of safety and security or sparked their sense of adventure and thrill-seeking.
YOLO did not do well this year.
👍 73% of consumers said that brands that increase their sense of safety and security were more attractive to them–an increase of 9 points over 2022’s survey results.
👎 Just 27% of consumers were looking for thrills and adventure in 2023.
The need to feel secure and in control is with us all the time, even when we’re doing our holiday shopping.
Your brand doesn’t have to sell products or services that shout “safe and secure!” to help your customers fulfill their sense of security’ needs.
The Edelman survey found consumers were responding to their feelings of insecurity by:
- monitoring prices more closely (68%),
- doing more research before making a purchase (58%), and
- making fewer impulse buys (58%).
Use your email campaigns and other channel communications to reassure your customers that buying from you is a decision they won’t regret.
🔹 Send emails that provide quality and service assurances and instill confidence.
🔹 Incorporate user-generated content (UGC), customer reviews, and testimonials into your content.
🔹 Deliver informational emails containing expert advice and post-purchase care messages that make people feel safe doing business with your brand.
Should you avoid using FOMO and urgency in your 2023 holiday email campaigns?
Because there are only so many days to reach consumers during the holiday shopping season, Black Friday, Christmas, and other winter holiday campaigns often rely on limited-time or last-chance messaging.
Urgency and fear of missing out (FOMO) messages can be effective persuasive devices, but not if they cause your subscribers to disengage from your brand.
Now might be a good time to reevaluate any fear-inducing messages in your holiday campaign flows.
🔹 Look back at the data from the September and October urgency-message campaigns (if you sent any) to see if your audience is still responding well to this tactic.
Also, monitor your subscriber and customer feedback across other channels for signs that they aren’t getting the comfort and reassurance they crave from your brand.
🔹 Use messages of urgency, scarcity, or fear of missing out prudently. The holiday retail season is built around a shared sense of festiveness. Help your subscribers feel good to build lasting loyalty.
🔹 Be authentic. Relate urgency and scarcity messages to actual conditions, such as shipping deadlines or limited inventory. Avoid countdowns or inventory counters that present false information. Use dynamic feeds to update your emails in real-time with real data instead.
🔹 Never present a fearful problem without offering a solution. Tell your subscribers exactly what they need to do to avoid whatever risk your message has warned them about.
👀 By the way, we took a closer look at the risks and rewards of FOMO campaigns earlier this year in 12 Last Chance Email Examples and Best Practices to Follow. Check it out to find tips, real-world examples, and a list of words and phrases you can add to your subject lines and preview text to nudge your subscribers to ‘act now.’
🎁 Convenience: End-to-end ease is essential (especially during the holiday shopping season)
Traditionally, holiday shoppers have been willing to stand in line, wait for an overwhelmed checkout page to load, or accept whatever payment and shipping terms a business offered to get items on their Christmas lists.
But don’t count on your audience being willing to endure inconveniences to buy from you this holiday shopping season—or any time of year.
Convenience ranked third, behind price and quality, as a key decision driver among US adults responding to Numerator’s March 2023 consumer convenience survey.
- 82% of survey respondents said convenience was very or extremely important to their buying decision.
Euromonitor International says convenience is “a critical factor influencing consumption and spending decisions.” The international business intelligence corporation says this desire for hassle-free experiences is a consumer-driven megatrend.
What does convenience mean to consumers in 2023?
While Numerator’s survey found that convenience is at the top of consumers’ wishlists in 2023, it also revealed that not every consumer views convenience in the same way.
Some shoppers value fast checkouts, while others want options like the ability to buy merchandise online and pick it up in-store (BOPIS).
McKinsey’s Zero Consumer profile says modern consumers have “zero boundaries,” crossing between online and offline channels on their path to purchase.
These “phygital” shoppers want to shop on their desired platform, switch between platforms during their buying journey, and select from a range of payment and delivery options.
A growing number of shoppers are combining online and offline visits to complete their transactions, seeking brands that offer fully omnichannel, phygital shopping experiences.
This is another moment where examining your customer data can reveal the best messaging to power your holiday email campaigns.
Where are your subscribers shopping, and what are the ordering, payment, shipping, and other choices that will convert them into customers?
Online shopping’s convenience may give it an edge during the holiday retail season
During the pandemic, online sales topped in-store activities for the first time. As we head into the 2023 retail holiday season, brick-and-mortar stores and ecommerce alternatives are too close to call.
Consumers will be thinking about convenience when choosing between shopping online or visiting a local store to complete their seasonal shopping chores.
🏬 Location was a critical convenience factor for 70% of those responding to Numerator’s survey; 83% said they considered the location closest to their home to be the most convenient.
💻 Convenience (76%) and time savings (67%) were the leading reasons consumers preferred online shopping to in-store alternatives, according to an October 2023 retail trends survey.
Ecommerce’s anytime, anywhere availability gives it an advantage among shoppers looking to maximize the time they spend looking for holiday gifts.
📱 This year’s early Thanksgiving shopping results show online shoppers are looking at small screens for big bargains. Initial reports indicate Black Friday mobile sales among US shoppers were up 10.4% year over year.
More than half of all Black Friday online sales were through mobile devices,, and nearly 80% of all Black Friday online traffic (browsing and buying) came through mobile devices, according to early reports.
Making experiences mobile-friendly is a must for increasing sales this year.
The ability to view a variety of products online, make comparisons across websites,, and have those items delivered to their homes were popular convenience factors among online shoppers surveyed for Morning Consult’s H1 2023 State of Retail and E-Commerce Report.
Four out of the five top convenience factors named in the report are related to delivery experiences.
Personalized touches such as product recommendations and the ability to save information, such as selections placed in their carts and their checkout details, were also shopper favorites. Easy to understand-and use return processes also made customers’ lists of reasons to like shopping online.
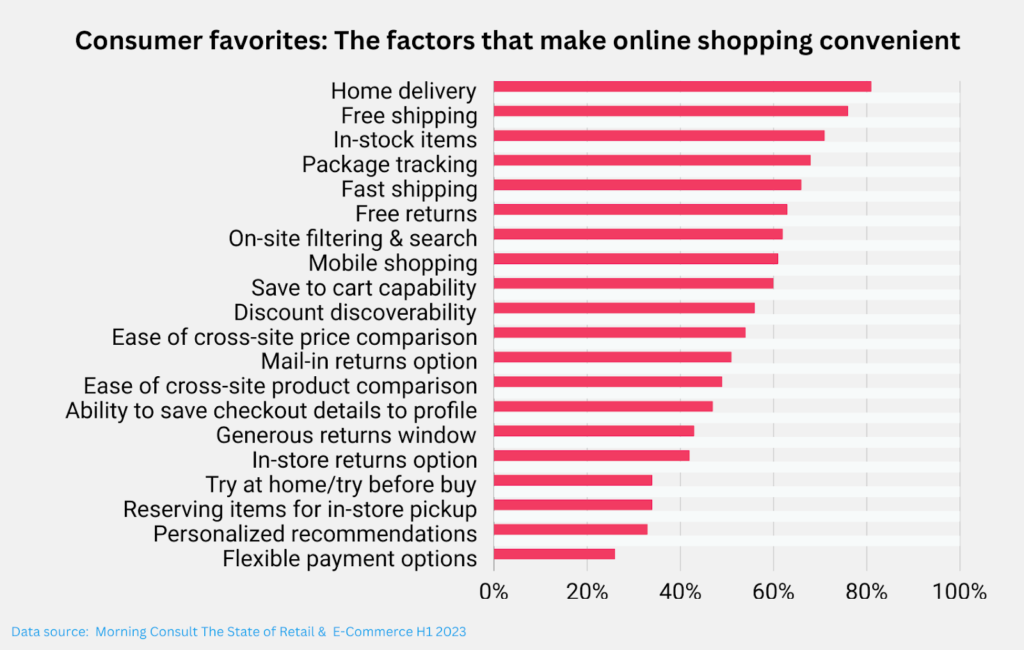
As consumers look for gifts for others and treats for themselves, they’ll go online to compare prices, shop at stores that carry items on their recipients’ wishlists, and want the complete package of price, selection, quality, and convenience.
They’ll also look for ways to shorten delivery wait times, reduce shipping fees, and easily return unwanted items by combining online shopping with visits to physical locations.
Communicate your convenience edge in your holiday email messages
Make it easy for your subscribers to choose to shop with your brand by communicating how you deliver convenience and reduce friction in your holiday email campaigns.
Examine your pre-Black Friday, Thanksgiving, Cyber Week, Christmas, Boxing Day, after Christmas, New Year’s, and other winter holiday marketing templates along with your campaign flows to see if there are places where you can explain and promote your convenience-boosting features to your audience.
👀 Take a peek at how other brands are presenting their convenience factors and other benefits this holiday marketing season in our Black Friday 2023 preview article.
🔹 Add links to relevant resources, such as your return and shipping policies and FAQ pages, to your template footers. This is a quick fix that delivers convenience and shows your subscribers you care.
🔹Describe your policies and explain how you’ll address their need to get the right gift to the right person in some of your Black Friday email promotions. During the holiday shopping season, your regular subscribers may want more information about shipping times and return policies.
🔹 If you’re expanding your return periods or have policies to help gift recipients return or exchange items, be sure to tell your subscribers about this benefit.
🔹 Highlight how easy it is for shoppers to purchase a gift and have it shipped to their recipient as well. Share information about your gift card, wrapping,, or other services in your Black Friday emails.
🔹 Promote your payment and credit options to BFCM shoppers. Some of this year’s consumers plan to spread their shopping out over several weeks to avoid a big credit card bill. But while they wait to spend, the risk of stock-outs and not getting their gifts in time increases.
If your business offers a ‘buy now, pay later’ option, explain how this feature solves these problems.
🔹 Send emails with product recommendations and gift-buying guides that make it easy for your subscribers to shop for themselves or others.
The holiday season can wreak havoc with your recommendation engines. Help your subscribers find the perfect item for someone else by developing segment-based recommendations. For example, send a gift guide email that shows subscribers what other parents of teens are buying this year or lists the perfect gifts for moms.
🔹 Don’t make it hard for subscribers to understand or use discounts or rewards points. Eliminate extra steps or complex calculations. No one wants to do more math than they have to during the holiday season (or ever)!
🔹 Tell your subscribers how to maximize the conveniences they value most across your brand’s properties in your holiday marketing emails. Explain shipping deadlines, in-store hours, and the locations of your owned or partnered return or pick-up sites.
🔹 Gather real-time data about click-throughs for these campaigns and their resources throughout the holiday season to learn more about what your subscribers want.
Anticipating and eliminating friction from each touchpoint can deliver critical revenue-boosting conversions to your business.
It may be a little late to upgrade your checkout pages or change your cross-channel journeys for this year’s holiday season. But it’s not too late to gather data about where the friction points are in your customers’ journeys and start building your ‘to-do’ list for next year.
🎁 Trust: Holiday shoppers will be quick to abandon brands that betray their trust
“Trust in the brand is central to conversion,” writes Digital Commerce 360’s Lauren Freedman.
Trust was a top influencer driving purchase decisions among participants in an online shopper survey co-sponsored by DC360 and Bizrate Insights; 46% of consumers selected ‘trust in brand’ as a decisive factor.
Only transactional factors, including ‘free shipping’ (69%), ‘the right price’ (66%), and ‘product selection’ (47%), outperformed trust as a conversion driver in this survey.
Edelman’s global consumer trust survey confirms this consumer sentiment. Eighty-eight percent of respondents selected trust as a top purchase consideration, behind only ‘value for money’ (91%), and ‘quality’ (89%).
Earning your customers’ trust is a revenue-builder, too.
📈 Edelman’s survey found that 59% of consumers were more likely to pay more for products and purchase a brand’s new products if they trusted them.
📈 Consumers worldwide were willing to pay an average of 46% more for products from retailers they trusted, according to Fortner’s Trust 2023 Premium Report.
As price sensitivity intensifies, having your customers’ trust may determine how deeply you’ll need to discount to win their purchases.
What does it take to earn consumers’ trust in your brand?
Earning and maintaining consumer trust in an omnichannel, always-on world isn’t always easy.
Wider access to comparison information and third-party sources of information about brands means your customers don’t have to just take your ‘word for it’ about anything.
Additionally, trust can be lost quickly if a brand experience disappoints.
📉 Half of the 2500+ consumers who participated in PwC’s 2023 Trust Survey (fielded in March) said that they had experienced a trust-damaging event that affected their relationship with a brand.
Delivering customer experiences that build confidence and avoid harm is essential for building brand trust.
Among respondents to PwC’s survey, data security and fast problem resolution were the leading trust-builders for consumers in 2023.
Consistency, reliability, and quality were also top contenders.
Clear communications, affordable products and services, strong financial performance, and value alignment also made the list of trust-worthy traits.
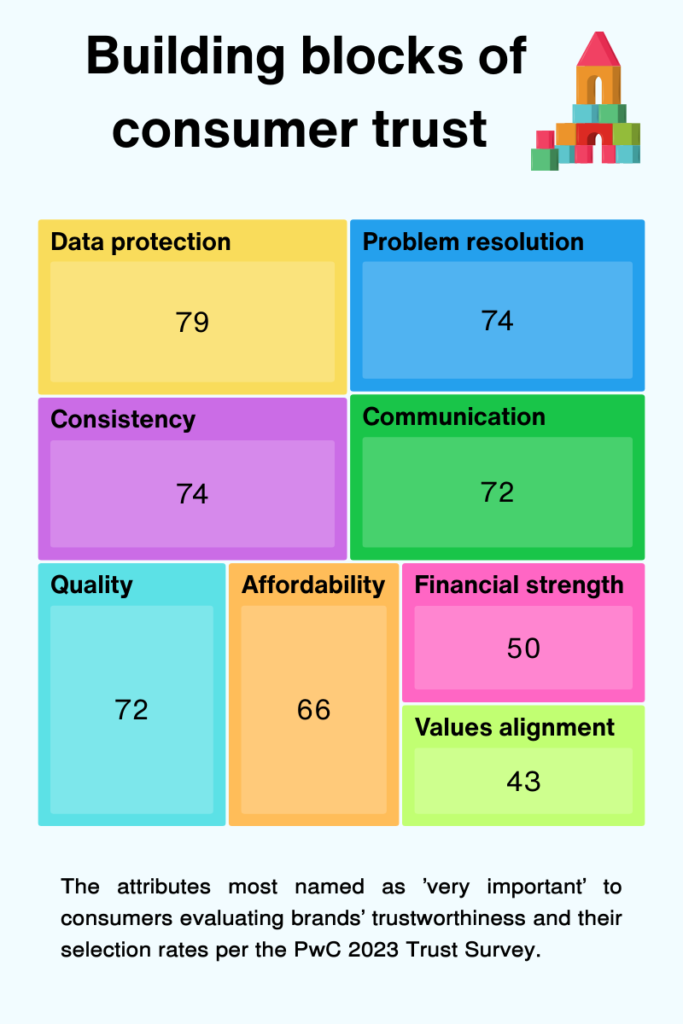
Data security topped the charts in Fortner’s results, too.
For the 2023 Trust Premium survey, Fortner asked shoppers to identify the attributes most important to them from a preset list of trust factors.
Nearly 90% of respondents chose data security as important to their judgment of a brand. Make sure your data handling processes are prepared to securely handle the zero- and first-party customer data you’ll gather this holiday season.
Affordability, reliability, and many convenience factors also scored high marks with survey respondents.
Consumers trust brands that deliver value and a positive customer experience.
You may not be in control of all of the factors that build consumer trust. For example, a strong brand reputation made the list with 76% of global consumers.
However, you can help guide the narrative about your brand through owned channels like your email list.
Earn consumer trust with seasonal emails that show your reliability
Core to your trust-building efforts are authenticity, transparency, and consistency.
Build seasonal emails that lead to lasting relationships and higher customer lifetime values through clear communications that accurately represent your business’s policies, practices, and values.
🔹 Start building trust with the first words of every email you send, including subject lines and preview texts.
Remember, your customers’ value comes from long-term relationships built on trust. Don’t succumb to the temptation to make promises you can’t keep to get openings and clicks!
Double-check your subject lines and make sure their promises match your email’s copy and what customers find when they click-through to your website match.
To earn and keep consumers’ trust, say what you’ll do, don’t hide what you’re doing, and do what you said you would.
🔹 If something goes wrong, be the first to tell your customers about it. Don’t wait until someone announces your failings on social media to address a situation with your customers.
Take an omnichannel but purposeful approach to handling negative rumors or bad news.
Communicate with your directly affected customers using transactional or targeted emails.
If a broader rumor needs to be addressed, consider the timing. If a broader rumor needs to be addressed, consider the timing.
Should you send a blast email, or can you wait and include the response in your next scheduled newsletter?
Be sure to include adequate contact information in all your messages and coordinate your response with customer-facing teams across your organization.
🔹 Do a pre-launch check on each one to make sure your links to trust-building pages are up-to-date and any third-party trust certifications or badges are still valid.
It’s probably been a while since you’ve looked at your holiday marketing templates–make sure you aren’t serving stale trust signals!
Reviewing the trust and transparency signals in your seasonal sales templates is especially important if your emails include sustainability-related badges or symbols. New regulations may limit which symbols you can continue to use, and your customers are becoming skeptical about the use of these badges.
🎁 Values: Financially pressed consumers still want values alignment with brands
Throughout the year, we’ve been paying close attention to the rise of conscious consumers who actively investigate the social and sustainability principles of the businesses they purchase from. The percentage of people looking for brands with values that align with their own is growing.
These customers look for brands that communicate their values and act on them.
A 5-year study of CPG brands conducted by McKinsey and NielsenIQ reveals that disclosing your shared values to your customers can increase conversions. While the study found that results vary, consumers “across generations, incomes, ethnicities, and regions” cared about a company’s environment, sustainability, and governance (ESG) practices.

Consumers also favor brands that support communities built around their shared values.
A shared interest in your company or its products may be the basis for a community of brand advocates. Distinguishing your brand community with a set of shared values is a powerful multiplier of this advocacy effect.
The flip side of that potential is that disappointing your community can fuel a prompt and powerful backlash.
Value alignment influences consumers’ trust in your brand. Your customers want to know you (transparency) and like you (values) before they’ll trust you.
According to the PwC 2023 Trust Survey I mentioned earlier,
- 59% of consumers trusted a brand more when they agreed with its position on an issue.
- 45% of consumers said they trusted the brand less if their positions on a values issue weren’t a match.
Value alignment isn’t the same for every brand, though. That’s something we discovered when we investigated how to reach conscious consumers through email marketing earlier this year.
So you’ll need to rely on your zero- and first-party data to discover which issues matter to your subscribers–and how much they matter.
The range of issues and depth of people’s commitment to shopping and their values vary.
Also, be aware that your customers may sometimes make choices that don’t align with their values because financial or other concerns take precedence.
This intention-action gap can be hard to track if you rely solely on self-reported value data.
To gain a fuller picture of where your customers stand, look at what they tell you and how they behave. Tap into both behavior and sentiment data to learn your audience’s ‘value graphics’ and discover what impact value alignment has on your revenue.
How to share information about your brand’s values and purpose in your holiday email campaigns
With authenticity and transparency as your guiding lights, tell your subscribers where you stand this holiday season through information, images, icons, and links to resources about your brand’s purpose and values-driven actions.
Keep your Christmas and other holiday promotions on-brand and consistent with the values your customers have told you matter to them.
🔹 Include non-promotional campaigns to your pre-Black Friday through New Year’s email marketing plans that inform your audience about the causes that matter to them and how they can take action.
🔹 Highlight your carbon-friendly shipping options or support for free trade or workers’ rights in your November and December newsletters and campaigns.
Some organizations share an annual environment, sustainability, and governance (ESG) report about their values-related efforts. Others use the season as a reason to provide subscribers with links to their ESG pages.
🔹 Provide feel-good by doing good content that entertains and educates. Describe where your products come from, share stories about the people who make or use your products, and encourage your customers’ values-related activities.
🔹 The holidays are a great time to share links to videos about your community-based activities or promote some of your vendors and partners and their role in your brand’s purpose. Use animated GIFs in your emails to give your subscribers a sneak peek and add extra sparkle to your seasonal campaigns.
🔹 Give your customers simple ways to act on their values when shopping with your brand.
One direct way to promote value in your holiday email campaigns is with a ‘donation with purchase’ offer.
According to the 2023 Higher Impact Report, which was based on a survey of more than 7,000 people across 7 nations, 77% of consumers say they “make a point to support brands that donate money or supplies to causes that are important to them.”
‘Buy and give’ offers show subscribers the causes your brand supports and help them feel good about their consumerism.
This type of joint effort also builds your customers’ sense of community–together with other shoppers, they are supporting a shared value.
🔹 Begin incorporating your subscribers’ value attributes into your personalization efforts.
Use what you learn about your subscribers’ and customers’ values to guide everything, from the campaigns you send to the products you recommend to individual subscribers.
You may not be able to incorporate this degree of personalized messaging into your 2023 holiday email messaging, but you can start planning for 2024.
🎁 Hyper-contextualization: Anticipate what your subscribers want and deliver it this holiday retail season
Everything leads to this. Orchestrating personalized customer journeys is a theme that should be top of mind for every brand now and in the new year. Marketers and strategists discuss hyper-segmentation and hyper-personalization, but the real purpose behind these efforts is hyper-contextualization.
Hyper-contextualization involves using all the data available to you to intersect each member of your audience with the right message at the right moment–wherever they are.
Moving toward hyper-contextualized messaging may not be easy or happen quickly.
But expectations are being set. Getting granular is a necessity for modern brands.
Your subscribers have already experienced this level of customized engagement when they visit their online streaming services, visit travel planning sites, or shop at ecommerce platforms that have deployed AI-powered contextual personalization at scale.
Delivering better, more contextual customer experiences increases customer engagement and conversions. Sending customized follow-up messages following a sale can boost your customer’s lifetime value and customers’ loyalty.
📈 Pre-purchase personalization yielded a 40% increase in sales-per-visit reported customer acquisition agency Centerfield, after analyzing more than 150 million first-party interactions.
Marketers polled by the firm for its October 2023 report said pre-purchase contextual marketing
🗸 boosted conversion rates,
🗸 increased ROI,
🗸 promoted customer retention, and
🗸 improved customer engagement.
📈 European shoppers were 3.28 times more likely to open an email customized to their stage in their buyer’s journey, according to a 2023 Customer Engagement Benchmark Report.
📈 Personalized recommendations were one of the top 5 trust signals for online retailers among Gen Z adults, Morning Consult’s Most Trusted Brands 2023 report reveals.
📈 Ecommerce returns platform Loop’s 2023 Consumer Loyalty Report, which surveyed shoppers in the US and UK, found that:
- 75% of consumers expect brands to suggest new products based on their past purchases and other interactions.
- 82% say it’s important for brands to send them post purchase incentives to encourage repeat purchases.
How can you deliver hyper-contextualized holiday emails to your subscribers?
Email marketing has an edge over other channels for hyper-contextualization because email supports individualized engagement at scale. Combining data and automation allows you to send personalized content timed to reach each subscriber at the right moment.
Achieving hyper-contextualization happens when you gather, integrate, and deploy the necessary data about your subscribers. You’re probably already using your CRM and other data sets, along with email automation to get you part of the way there.
The next phase is truly contextual messages that achieve ‘right now relevance’ by selecting dynamic content and individualized send triggers based on real-time data.
Artificial intelligence and machine learning facilitate orchestrating these highly customized buyer’s journeys moment by moment. Generative AI adds new marketing capabilities to your toolset, such as displaying customized banners on websites or placing individually designed or selected images into marketing emails.
We’ve yet to discover everything the latest set of gen AI tools can do for marketers, and new tools are arriving daily. So stay on your toes.
Maintain your share of the wallet this holiday season and your customers’ loyalty in the future by recognizing and meeting their individual needs with tailored right-timed emails.
🔹 Start by reviewing your segmentation. Are the categories you’re relying on overbroad or based on attributes based solely on demographics or journey stage?
🔹 Next, enhance your triggered campaigns with more branches and distinct message templates for each segment. Build a wider array of automated communications to better tailor each individual’s experience.
Continuously collect new data and evaluate your data set for knowledge gaps. Accurate, comprehensive data about your subscribers and their preferences is essential to delivering one-of-a-kind experiences at scale.
🔹 During this holiday season, check your sources to determine if you have access to the information you need to identify spending and sentiment patterns. If not, start making your data wishlist for next year.
🔹 Don’t ignore good data governance or common sense when collecting and using subscriber data. Consider your subscribers’ perspective before using the data you collect.
Are you using information your subscribers would expect you to know?
🔹 Use your preference centers and interactive emails to give your subscribers channels to tell you directly what they want. And then pay attention to what they say.
Your subscribers want you to use the information they’ve shared with you for their benefit and are likely to stop sharing data with you if they get nothing in return.
🔹 Use product recommendation engines and AI-powered insights to make smart suggestions for your holiday audiences. Add content recommendation tools to your tech stack to customize the informational and other content displayed in your subscribers’ messages.
Build dynamic blocks into your holiday campaign templates to make room for this personalized content.
👀 What are the different types of product recommendations, and how can you use them in your holiday email messages? Discover the details and view real-world examples in our article, 18 Product Recommendation Emails to Drive Conversions and Revenue.
🔹 Level up your engagement game. Go beyond recommendation engines and’say my name’ personalization in your holiday email campaigns. Use email engagement analytics to determine the best frequency and cadence of the messages you send.
Supplement segment-level send-time optimization strategies with AI-guided individual send-time optimization that recognizes the moments when your subscribers are viewing their inboxes.
Speaking of sending your emails at the right time, when is the right time to send your Christmas and winter holiday emails this year?
When should you send your holiday email campaigns? Now and later
Consumers’ desire to find the best deal may mean tight margins for retailers in 2023. But it also means an extended holiday shopping season. While some shoppers started searching for deals while spring flowers were still in bloom, many will wait until the last minute to squeeze the most from their holiday budgets.
⏰ Nearly 60% of respondents to a September 2023 Gallup Holiday Shopper Pulse poll said they’d begin holiday shopping in November (39%) or December (20%). The Gallup poll found that younger shoppers were willing to start shopping in October if they found a good deal.
⏰ A McKinsey ConsumerWise survey conducted in October 2023 revealed that 40% of US consumers planned to start their holiday shopping in November, and 10% would wait until December to get started.
⏰ According to preliminary Black Friday retail performance reports, consumers on the lookout for bargains are spending some of their remaining holiday budgets during Cyber Week–but not all.
A portion of your subscribers are still holding off on making their holiday purchases, hoping to get a better deal or to put off adding to their credit debt until December.
Cyber Monday sales reportedly outperformed Black Friday’s preliminary figures, and we’re still seeing lots of “sale extended” and similar offers in our inboxes.
Keep offering fresh deals and informing your email subscribers about your last-minute shipping and ‘buy online, pick up in-store’ options to capture those December holiday sales.
Then gear up for 2024 and a new year of seasonal sales opportunities!
We’ve put together two comprehensive guides to help you get your email marketing program in top shape.
🎅📝Use our email marketing pre-launch guide to build sending checklists that keep your emails off the naughty list and our email marketing program audit guide to ensure that all your processes are primed for success in the new year.


